How to Sanitize Your Kitchen the Right Way (Without Losing Your Mind)
A truly sanitized kitchen isn’t just “looks clean.” It’s about reducing germs on the surfaces that touch your food, hands, and dishes. That’s different from everyday wiping and tidying.
This guide walks through what “sanitizing” actually means, how it differs from cleaning and disinfecting, and a step‑by‑step way to handle it in a normal home kitchen. You’ll also see how your own household (kids, pets, allergies, etc.) shapes what “the right way” looks like for you.
Cleaning vs Sanitizing vs Disinfecting: What’s the Difference?
These terms get used interchangeably, but they’re not the same thing.
| Term | What it does | Typical products used | Everyday example |
|---|---|---|---|
| Cleaning | Removes dirt, grease, crumbs, and some germs | Soap/detergent + water, all-purpose cleaner | Wiping a greasy stove with soapy water |
| Sanitizing | Reduces germs to safer levels on food-contact surfaces | Kitchen sanitizing spray, diluted bleach, sanitizing wipes | Treating a cutting board after raw chicken |
| Disinfecting | Kills more types and higher amounts of germs (often stronger chemicals) | Disinfectant sprays, stronger bleach solutions | Treating a trash can after a leak or raw meat juice |
Key distinctions:
- You must clean before you sanitize or disinfect. Grease and crumbs keep sanitizers from working properly.
- Sanitizing is usually the target for kitchen surfaces that touch food, like counters, cutting boards, and utensils.
- Disinfecting is typically reserved for high-risk messes, like raw meat spills or someone in the home being sick.
What “the right way” looks like for you depends on:
- How often you cook at home
- Whether you prepare a lot of raw meat, eggs, or seafood
- Whether you have young kids, older adults, pregnant people, or immunocompromised people in the household
- Any chemical sensitivities or allergies
Step 1: Know Which Kitchen Areas Actually Need Sanitizing
Not every surface in your kitchen needs the same level of attention. Some areas mainly need cleaning; others are “germ hotspots” that benefit from regular sanitizing.
Common disinfect/sanitize priority spots:
Food prep surfaces
- Countertops, especially near the sink or stove
- Kitchen island work surfaces
- Cutting boards (especially after raw meat, eggs, or seafood)
High-touch points
- Faucet handles
- Fridge handles and doors
- Microwave buttons and doors
- Stove knobs and oven handles
- Drawer and cabinet pulls
- Light switches
Cross-contamination risks
- Sink (especially around drain and faucet base)
- Trash can lids and surrounding floor
- Fridge shelves and drawers (raw meat leaks, spills)
- Handles of frequently used tools (spatulas, knives, measuring cups)
Other areas—like the top of the fridge or decorative shelves—may mainly need occasional dusting and cleaning rather than regular sanitizing.
Step 2: Choose Products That Match Your Kitchen and Your Comfort Level
You’ll see three broad approaches in home kitchens:
1. Traditional Chemical Sanitizers
These are common and widely available.
Examples (categories, not brands):
- Diluted bleach solution
- Kitchen sanitizing sprays labeled for food-contact surfaces
- Sanitizing wipes labeled safe for kitchen use
What shapes your choice:
- Household health: Some households with vulnerable people may choose more frequent sanitizing with proven chemical products.
- Personal comfort: If you’re sensitive to smells or ingredients, you may prefer gentler products or ensure very thorough rinsing.
- Surface materials: Natural stone, sealed wood, and stainless steel often have care instructions. Strong chemicals can sometimes dull or damage finishes over time.
2. “Natural” or Plant-Based Products
These typically use plant-derived ingredients or weak acids like vinegar as the main cleaning agents.
Important to understand:
- Cleaning vs sanitizing claims: Some “natural” products are great cleaners but may not be tested or labeled as sanitizers.
- Label language matters: “Cuts grease” or “cleans” is different from “kills bacteria” or “sanitizes.” If germ reduction is your goal, check those claims.
3. Simple Home Staples
Many people use:
- Hot, soapy water (very effective for cleaning, essential first step)
- Plain vinegar (good cleaner for some soils; not a broad, officially recognized sanitizer in every context)
- Baking soda paste (for scrubbing stuck-on messes)
These can be part of a routine and help reduce how often you rely on stronger products, but again: cleaning power is not the same as proven sanitizing.
What you ultimately choose will likely mix all three approaches, depending on:
- How “heavy-duty” your cooking is
- Your priorities (lowest chemical load vs. maximum germ reduction)
- How much time you’re willing to spend rinsing and ventilating
Step 3: Follow the Basic “Clean Then Sanitize” Sequence
No matter what products you use, the sequence is usually the same:
1. Clear and Declutter
- Put away food, spices, and utensils that don’t need to be out.
- Move appliances if needed so you can reach behind and under them.
- Toss obvious trash and empty the sink.
This step makes everything else faster and more thorough.
2. Clean with Soap or Detergent First
Your goal here is to remove visible dirt, grease, and food residue.
- Use warm, soapy water or an all-purpose kitchen cleaner.
- Wipe counters, stove tops, and splash zones.
- Scrub problem spots like dried spills and oily corners.
- Rinse the cloth or sponge often to avoid spreading grime around.
For heavy buildup (like around the stove or on cabinet fronts), you may need:
- A degreaser (if compatible with your surfaces)
- A scrub brush or non-scratch scrub pad
3. Rinse if Needed
Some cleaners need rinsing to avoid leaving residue that can interfere with sanitizers. Check your product label. When in doubt, a quick wipe with a clean damp cloth removes leftover soap.
4. Apply Sanitizer Properly
This is where many people go wrong. Three things matter:
Coverage
Make sure the sanitizer actually touches the whole surface, not just the middle.Contact (or “dwell”) time
Many products need to stay visibly wet on the surface for a certain amount of time to work effectively. This might be a few minutes, depending on the product. If you spray and wipe immediately, you may mostly be cleaning, not sanitizing.Surface type and label directions
- Food-contact surfaces (cutting boards, counters where you place food) often have instructions about whether you need to rinse after sanitizing.
- Non-food-contact areas (trash cans, floor) might have different directions.
Always read the small print on the label—especially about:
- Ventilation
- Protective gloves or precautions
- Rinse vs no-rinse directions
Step 4: How to Sanitize Specific Kitchen Areas
Different spots call for slightly different routines.
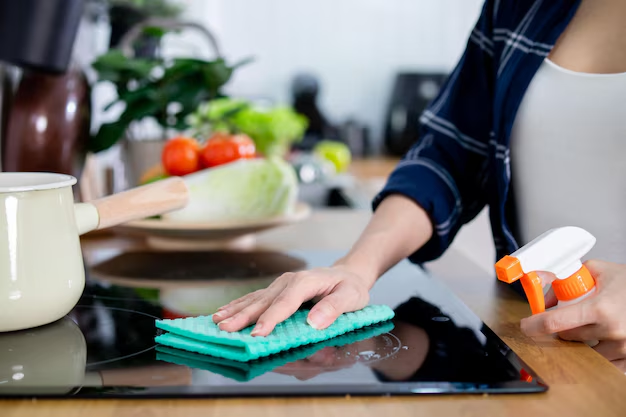
Countertops and Prep Surfaces
- Wipe away crumbs and clutter.
- Wash with warm, soapy water or your all-purpose cleaner.
- Rinse if needed.
- Apply your chosen sanitizer evenly.
- Let it sit for the labeled time, keeping the area wet.
- Rinse or air-dry, depending on instructions, especially where food will touch directly.
Variables that matter:
- Material: Natural stone, laminate, butcher block, and stainless steel each have care guidelines.
- How you use the space: If you roll dough directly on the counter, you may be more careful about rinsing sanitizers afterward.
Cutting Boards
Cutting boards are prime spots for bacteria, especially after raw meat.
Basic routine:
- Scrape off food with a scraper or spatula.
- Wash with hot, soapy water, scrubbing grooves.
- Rinse thoroughly.
- Sanitize:
- For plastic boards, many people use a dishwasher (if labeled dishwasher-safe) or a sanitizer.
- For wood boards, use a sanitizer suitable for wood, and avoid soaking; water can warp or crack them.
- Air-dry upright so moisture can escape.
Factors to think about:
- Deep knife grooves can trap bacteria. Some people retire heavily grooved boards from raw meat duty or use them only for bread/produce.
- Color-coded boards (one for meat, one for produce) are a simple way to reduce cross-contamination.
Sink and Faucet Area
The sink can be one of the germiest spots in the kitchen.
Routine:
- Remove dishes and food scraps.
- Scrub the sink basin, sides, and drain area with hot, soapy water or a cleaner suitable for your sink material.
- Clean around the faucet base, handles, and soap dispenser.
- Rinse well.
- Apply sanitizer to the faucet handles, controls, and high-touch areas.
- Let it sit for the recommended time, then rinse or wipe if needed.
Variables:
- Sink material (stainless steel, composite, ceramic) may influence which cleaners/sanitizers are safe.
- How often you handle raw meat over the sink or thaw food there.
Stove, Oven Handles, and Knobs
Grease + high touch = hot zone.
- Wipe loose crumbs and spills.
- Clean with a degreaser or warm, soapy water, depending on buildup.
- Rinse or wipe off cleaner residue.
- Sanitize knobs and handles, letting them stay wet for the label’s time.
Be careful not to flood electronic controls; spray onto a cloth instead of directly onto panels.
Fridge Exterior and Interior
Exterior:
- Clean and then sanitize handles, doors, and touch panels.
- For stainless steel, use a suitable cleaner that won’t scratch or streak.
Interior:
- Remove food and shelves/drawers if you’re doing a deep clean.
- Wash spills and sticky spots with mild soap and water.
- Rinse or wipe with clean water.
- For areas that see raw meat packages or leaks, apply sanitizer that’s safe for fridge interiors, then wipe or rinse as needed.
Variables:
- Food sensitivities: Some people prefer minimal residue and careful rinsing inside the fridge.
- How often spills happen and how tightly food is packaged.
Trash Cans and Surrounding Area
- Empty the trash.
- Rinse the can if feasible (outside or in a tub, depending on your setup).
- Scrub with hot, soapy water or a cleaner.
- Rinse thoroughly.
- Sanitize the inside, rim, and lid—plus any surrounding floor that sees frequent drips.
- Allow to dry completely before putting in a new bag.
If raw meat leaks or something particularly unpleasant spills, many people opt for disinfecting rather than just sanitizing here.
How Often Should You Sanitize Your Kitchen?
There isn’t one “right” schedule. It depends on how you cook and who lives in your home.
Here’s a general spectrum of routines, not a prescription:
| Kitchen use / household profile | Typical sanitizing approach (examples only) |
|---|---|
| Light cooking, healthy adults only | Spot-sanitize after raw meat, weekly deeper sanitizing |
| Daily cooking, mix of raw/ready-to-eat foods | Regular sanitizing of counters and sink, extra after meat |
| Kids, older adults, or immunocompromised folks | More frequent sanitizing of high-touch and food prep areas |
| Someone currently sick in the home | Extra focus on handles, switches, fridge/stove/faucet area |
You can adjust:
- Frequency (daily, a few times a week, or mainly after risky tasks)
- Intensity (quick spray-wipe vs. full clean + sanitize with contact time)
- Coverage (whole kitchen vs only hotspots)
What matters most is consistency over time and paying attention to higher-risk moments (like raw meat handling).
Common Mistakes When “Sanitizing” a Kitchen
These slip-ups are widespread and easy to miss:
Skipping the cleaning step
Spraying sanitizer directly onto a greasy or crumb-covered counter wastes product and doesn’t give you true germ reduction.Not letting the sanitizer sit long enough
If you spray and immediately wipe dry, you might just be doing a second cleaning pass. The germ-killing claims usually assume a certain wet contact time.Using the wrong product for the job
- A great degreaser might not be a sanitizer.
- A bathroom disinfectant may not be labeled safe for food-contact surfaces.
Overusing harsh products on delicate surfaces
Some finishes can dull or degrade with frequent strong chemical use.Reusing dirty cloths or sponges
If your cloth is already loaded with germs or grease, you can spread contamination instead of removing it. Regularly wash, sanitize, or replace cleaning tools.Ignoring small high-touch spots
Microwave buttons, coffee machine handles, cabinet pulls, and light switches often get touched dozens of times a day and seldom get sanitized.
Adapting Kitchen Sanitizing to Your Household
The “right way” for you depends on a few big-picture factors:
1. Health Conditions in the Home
Households may vary in how cautious they want to be:
With young children, older adults, pregnant people, or immune-compromised individuals, many prefer:
- More frequent sanitizing of counters, sinks, and fridge handles
- Extra care after handling raw meat, eggs, or seafood
With generally healthy adults and light cooking, some may:
- Focus on prompt cleaning and spot-sanitizing after higher-risk tasks
- Reserve stronger chemicals for obvious contamination
2. Cooking Style and Volume
Heavy cooking with lots of raw ingredients generally benefits from:
- More routine sanitizing of prep areas and cutting boards
- Careful separation of raw and ready-to-eat foods
Mostly pre-packaged or takeout may need:
- Less frequent deep sanitizing
- Focus on high-touch handles and the sink area
3. Surface Materials and Kitchen Design
- Stone, wood, laminate, stainless, tile, and composites each have their own care guidelines.
- Grouted areas, seams, and crevices can trap moisture and debris, making them higher-risk spots that may deserve extra attention.
- Smaller kitchens often have multi-use surfaces (e.g., the same counter for prep, serving, and drop zone), which may influence how often you sanitize.
4. Chemical Sensitivities and Personal Preferences
Some people prioritize:
- Lower fragrance or fragrance-free products
- Plant-based ingredients
- Minimal use of strong disinfectants except when clearly needed
Others prioritize:
- Highest possible germ reduction, especially if someone is at higher risk of infection
Your own balance between these goals will guide which products you’re comfortable using and how often you use them.
Quick FAQ on Sanitizing Your Kitchen 🧼
Do I really need to sanitize every day?
Not necessarily. It depends on how much you cook, what you cook, and who lives with you. Many people focus on sanitizing after higher-risk tasks (like raw meat prep) and do broader sanitizing during routine cleaning days.
Is vinegar enough to sanitize my kitchen?
Vinegar can be a good cleaner for some jobs, but it’s not a universal, officially recognized sanitizer in every setting. If your goal is confirmed germ reduction to specific standards, look for products that are specifically labeled as sanitizers and follow their directions.
Are disinfecting wipes safe on cutting boards?
Only if the label says they’re safe for food-contact surfaces and you follow any rinsing instructions. Many disinfectant products are designed for non-food surfaces and need rinsing before food touches them.
Can I just use hot water instead of sanitizer?
Hot water helps with cleaning and can remove some germs, especially when paired with soap, but it’s usually not a direct replacement for a properly used sanitizer—especially after handling raw meat or when someone in the home is sick.
What’s the most important thing to focus on if I’m short on time?
People often prioritize:
- Counters and cutting boards after raw meat prep
- Sink and faucet handles
- Fridge, stove, and microwave handles These are high-touch areas where germs move around the fastest.
If you understand the difference between cleaning and sanitizing, know which spots are most important, and follow label directions for the products you choose, you’ll have a kitchen that’s not just tidy—but genuinely safer for handling food.