How to Safely Replace a Light Fixture at Home
Replacing a light fixture is one of those DIY electrical jobs many homeowners consider. For some, it’s a straightforward swap. For others, it’s a project better handed off to an electrician.
The right answer for you depends on your comfort with tools, your home’s wiring, and the specific fixture you’re dealing with. This guide walks through how light fixtures are typically replaced, what can complicate the job, and the safety checks you’ll want to make along the way.
Quick FAQ: Common Questions About Replacing a Light Fixture
Is it safe to replace a light fixture myself?
It can be safe for many people if:
- You understand basic electrical safety
- Your wiring is modern and in good condition
- You’re only swapping one fixture for another (same general type and location)
- You know how to turn off and verify power is off at the breaker
It becomes higher risk when:
- Wiring is old, brittle, or ungrounded
- There are multiple switches controlling the same light
- You see multiple cables and complex connections inside the box
- You’re not sure how to read wire colors or identify ground/neutral/hot
In those more complicated cases, many people choose to bring in a pro rather than trying to decode mystery wiring on their own.
What you’re actually doing when you replace a light fixture
At its core, replacing a light fixture usually means:
- Shutting off power
- Removing the old fixture
- Connecting the new fixture’s wires to the house wiring
- Mounting the new fixture to the electrical box
- Restoring power and testing
You are not (in a basic swap):
- Rewiring the whole circuit
- Adding new switches
- Running new cables through walls or ceilings
Those kinds of jobs are more advanced and have more code and safety implications.
Tools and materials people commonly use
You don’t need a shop’s worth of tools, but some basics make the job easier and safer:
| Item | What it’s for | Why it matters |
|---|---|---|
| Voltage tester (non-contact or probe) | Checking if power is really off | Extra safety check before touching wires ⚡ |
| Screwdrivers (flat-head, Phillips) | Removing fixture, mounting bracket | Almost always needed |
| Wire strippers | Stripping insulation off wire ends | For clean, solid connections |
| Wire connectors (wire nuts) | Joining wires together | Secure electrical connection |
| Pliers | Bending and holding wires | Helpful for shaping hooks and tightening |
| Step ladder | Safe access to ceiling fixtures | More stable than a chair |
| Safety glasses | Protecting your eyes | Dust, debris, falling screws |
Some fixtures include hardware like mounting brackets, screws, and wire nuts. Quality varies; many people prefer to use connectors they trust rather than the cheapest ones in the box.
Step-by-step: How to replace a standard ceiling or wall light fixture
This is a general walkthrough of a typical situation: swapping one surface-mounted fixture (like a flush-mount ceiling light, simple pendant, or wall sconce) for another in the same place.
Your exact wiring and fixture instructions may be different, and those always take priority.
1. Turn off the power — and double-check it
- Go to your electrical panel and switch off the breaker that controls that light.
- Try turning on the wall switch for that light. If it still comes on, you’ve got the wrong breaker.
- Once the light won’t turn on, use a voltage tester on the fixture wires or on the exposed screws (after partially removing the fixture) to confirm no power is present.
Variables that matter here:
- Older homes sometimes have mislabeled panels.
- Some circuits share a neutral or have multiple feeds; that can be confusing without experience.
- A non-contact tester can sometimes give false positives if used incorrectly; a clear test method is important.
If you can’t confidently verify power is off, this is usually the point people decide to stop and call an electrician.
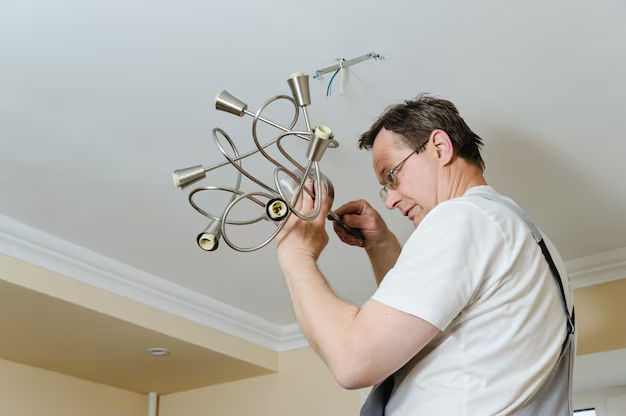
2. Remove the old fixture carefully
For most basic fixtures:
- Remove the bulbs and glass shades first. This takes weight off and reduces breakage risk.
- Look for visible screws holding the fixture base or canopy to the ceiling or wall bracket.
- Support the fixture with one hand while you:
- Loosen the mounting screws
- Gently pull the fixture away from the box
Most fixtures will be wired with three main conductors:
- Hot (live) — often black (or red)
- Neutral — often white
- Ground — bare copper or green
You may also see:
- Multiple hot wires joined together
- A ground wire from the box (metal box) and from the cable
- Wires from multiple switches controlling the same light
Once you can see the wires:
- Take a photo of the wiring before disconnecting anything. This gives you a reference.
- Unscrew or twist off the wire connectors and separate the fixture wires from the house wires.
- Remove the old bracket if the new fixture uses a different one.
When removal may be trickier:
- Painted-over fixtures or brackets may stick to the ceiling.
- Heavy fixtures (chandeliers, large flush mounts) may need a second pair of hands.
- Old wires may be stiff, cracked, or brittle; pulling too hard can cause damage.
3. Inspect the electrical box and wiring
Before putting up the new light, most people check a few things:
Is the electrical box solidly attached?
- It should not wobble or move.
- Heavy fixtures need a proper box and support, especially on ceilings.
What condition are the wires in?
- Insulation should be intact, not flaking or crumbling.
- If wires look damaged or extremely old, it may not be a simple DIY job.
Is there a ground available?
- You should see either:
- A bare copper or green wire, or
- A metal box with a ground wire attached or a grounding screw
- You should see either:
If the box appears loose, undersized, severely rusted, or you don’t see any ground with old wiring, that’s a sign the job is more than a simple swap.
4. Get familiar with the new fixture’s wiring
New fixtures usually come with:
- A mounting bracket or strap
- Fixture wires (usually color-coded)
- Ground wire (green or bare)
- Installation instructions from the manufacturer
Common color code on the fixture:
- Black (or sometimes blue) — hot
- White — neutral
- Green or bare — ground
House wiring may match that, but not always. Some older or non-standard setups can look different, which is why that earlier photo and careful observing matter.
Variables that can affect this step:
- Multiple switch locations (3-way or 4-way switches) can make the wiring look more complex.
- Some fixtures (like smart fixtures) may have extra wires for control.
- In some homes, neutral may not be present in switch boxes, though it’s usually present at the ceiling box.
5. Mount the new bracket or plate
Follow the fixture instructions to install the mounting bracket onto the electrical box:
- Line up the bracket with the screw holes in the box.
- Use the provided screws (or appropriate ones for your box) to attach the bracket firmly.
- If the bracket has a grounding screw, attach the house ground wire (or a pigtail to it) here if required.
Things that can vary:
- Some fixtures use a crossbar; others use a round or rectangular strap.
- Heavy fixtures may call for additional support beyond a simple box, especially in ceilings.
6. Connect the wires correctly
This is the part that makes most people understandably cautious.
Typical connections in a simple, modern setup:
- House black (hot) → Fixture black (hot)
- House white (neutral) → Fixture white (neutral)
- House ground (bare/green) → Fixture ground (bare/green) and/or grounding screw
General best practices:
- Hold the two bare wire ends side by side and twist them together (or align with a short “pigtail” if multiple connections are required).
- Screw on a wire connector until it’s snug and you can’t easily pull it off.
- Ensure no bare copper is exposed below the connector (except for ground, where exposed copper is normal).
- Gently fold the wires back into the box to avoid pinching.
Situations that can complicate wiring:
- Multiple cables in the box feeding other lights or outlets
- A red wire (often a switched hot) used in multi-switch setups
- Older wiring where color coding doesn’t match modern practice
- No visible ground wire in older homes
In those cases, someone with electrical training typically needs to trace the circuit and identify each conductor. Guessing which wire is what is exactly how people get shocked or damage equipment.
7. Attach the fixture to the bracket
Once wiring is complete:
- Tuck the wires carefully into the box.
- Lift the fixture into place and align it with the bracket.
- Install the mounting screws, nuts, or decorative caps according to the instructions.
- Make sure the fixture is:
- Flush against the ceiling or wall (unless it’s designed to hang)
- Level and straight
- Not pinching any wires
Then install:
- Bulbs with the correct type and wattage (or equivalent for LED)
- Shades or glass according to the instructions
Using bulbs that exceed the fixture’s rated wattage or output can create a fire risk, especially in enclosed fixtures.
8. Restore power and test the light
Finally:
- Turn the breaker back on.
- Use the wall switch to test the light.
- If the light doesn’t turn on:
- Turn the breaker back off before checking anything.
- Verify bulbs are installed correctly.
- Re-check your connections and your original photo.
- Confirm the breaker and switch are working as expected.
If the breaker trips, lights flicker, or anything buzzes or smells hot, switch the breaker off right away and do not keep trying to use the circuit.
What makes one light fixture replacement harder than another?
Not all “simple” light swaps are created equal. Here are some of the variables that change the difficulty.
Wiring complexity
| Wiring situation | Typical difficulty | Why it matters |
|---|---|---|
| Single cable (one black, one white, ground) | Lower | Only one set of wires to connect |
| Multiple cables in the box | Higher | Feeds other parts of the circuit; easier to miswire |
| 3-way/4-way switches (light controlled from more than one location) | Higher | Extra conductors (often red), more complex logic |
| Very old wiring with unusual colors or cloth insulation | Higher | Harder to identify hot/neutral/ground |
Fixture type and weight
| Fixture type | Notes |
|---|---|
| Small flush-mount or simple sconce | Usually the easiest to swap; lighter and simpler brackets |
| Pendant light | Still manageable for many people; may need height adjustment |
| Ceiling fan with light | Heavier, moving parts, often requires a fan-rated box and more wiring |
| Large chandelier | Heavy, awkward to support, sometimes requires additional structural support and careful assembly |
In general, the heavier and more complex the fixture, the more important the support structure and installation technique become.
Age and condition of the home
Older homes can bring:
- Ungrounded circuits (no ground wire present)
- Smaller or shallow boxes that don’t comfortably fit new fixtures and wiring
- Knob-and-tube or other outdated wiring methods
- Non-standard past repairs done by previous owners
These don’t automatically mean a fixture can’t be replaced, but they do change the safety picture and may trigger code or insurance considerations in some areas.
Common questions about specific situations
What if my old fixture doesn’t have a ground wire?
In older homes, you may see:
- Only two wires (often black and white), no bare/green ground
- A metal box and metal conduit that may be serving as ground
Whether you can safely attach a new fixture’s ground to the box or whether you’re working with an ungrounded system is something that depends on:
- The wiring method used in your walls and ceilings
- Local electrical code
- The type of fixture being installed
For many people, this is the point where an electrician’s opinion is worth considering.
Can I change a flush-mount light to a ceiling fan?
Not as a simple “fixture swap.”
Ceiling fans:
- Are heavier and create dynamic loads (they move)
- Usually require a fan-rated electrical box and proper support attached to framing
- Have more complex wiring (fan, light, maybe remote or separate switch control)
Some DIYers handle this, but it’s a different project from just replacing a light with another light.
Why are there more wires in my ceiling box than in the fixture?
That usually means the box is acting as a junction point for:
- Power coming from the panel
- Power going on to another light or outlet
- Wires going to a switch (or multiple switches)
- Sometimes other devices on the same circuit
In those cases, the fixture usually connects to one set of those wires, while the others are tied together in specific ways. Without understanding which is which, it’s very easy to break the circuit or create unsafe connections.
Do I need a permit to replace a light fixture?
Whether a permit is formally required can depend on:
- Local building codes in your area
- Whether you’re doing a simple like-for-like replacement or adding/removing wiring
- The broader scope of your project (e.g., a full remodel vs. one fixture)
A lot of places treat a basic fixture swap differently from running new wiring or adding new circuits. The only way to know for sure is to check your local rules or ask your local building department.
How to decide if this is a DIY job for you
You don’t need to be an electrician to understand your own comfort level. People often think about questions like:
- Do I understand the steps well enough to explain them to someone else?
- Am I comfortable working on a ladder with my hands over my head?
- Is my home’s wiring relatively modern and clearly labeled?
- Do I know how to shut off and verify power safely?
- Am I prepared to stop and get help if something doesn’t look right?
On the flip side, situations that often push people toward hiring a pro include:
- Very old or damaged wiring
- Multiple switches controlling the same light
- No ground visible in the box
- Fixtures that are very heavy or complex
- A panel that’s poorly labeled or confusing
Only you can balance your skills, patience, and appetite for risk. Understanding the landscape — the steps, the variables, and the warning signs — gives you a more solid footing, whether you decide to tackle the project yourself or hand it off.